Selenium and TestNG
This documentation was written by Felipe Knorr Kuhn and is adapted from a series of articles posted on his blog. Content * How to use TestNG configuration methods with parameters * How to configure your test * Creating the XML file for TestNG * Lauching your tests with Eclipse * How to make the test design a little better for the future
Modeling your test case
Before writing a test case, you need to know how and what will be validated. Let's use the WordPress "Create New Post" test case.
- Go to http://demo.opensourcecms.com/wordpress/wp-login.php
- Enter "admin" in the "Username" field
- Enter "demo123" in the "Password" field
- Click on the "Log In" button
- Verify that the text "Howdy, admin" is present
- Click on the "Posts" link
- Click on the "Add New" button
- Type "Selenium Demo Post" in the title field
- Click on the "Publish" button
- Verify that the text "Post published" is present
Considering this scenario, the first thing that comes to mind is creating a long test case that goes through all the steps. This might be a good approach if you are writing a manual test case. However, since we are writing an automated test, we want to write our script as modular as possible to be able to reuse parts of it in future scenarios.
This is how I would break down the test:
- Launch the WordPress site
- Open the Admin Login page
- Enter valid login data
- Navigate to the Write Post page
- Write the post
- Publish the post
- Verify that it was actually post
Keep in mind that this is just an example. You are free to model your tests in any way you want, as long as they have business value and will validate your business logic.
Let's see how to do that with actual Java code:
@Test(description="Launches the WordPress site")
public void launchSite(){
  selenium.open("");
  selenium.waitForPageToLoad("30000");
  assertEquals(selenium.getTitle(), "Demo | Just another WordPress site");
}

@Test(description="Navigates to the admin page")
  public void openAdminPage() {
  selenium.open("wp-admin");
  selenium.waitForPageToLoad("30000");
  assertEquals(selenium.getTitle(), "Demo › Log In");
}

@Test(description="Enters valid login data")
  public void loginAsAdmin() {
  selenium.type("user_login", "admin");
  selenium.type("user_pass", "demo123");
  selenium.click("wp-submit");
  selenium.waitForPageToLoad("30000");
  assertTrue(selenium.isTextPresent("Howdy, admin"));
}

@Test(description="Navigates to the New Post screen")
public void navigateNewPost() {
  selenium.click("//a[contains(text(),'Posts')]/following::a[contains(text(),'Add New')][1]");
  selenium.waitForPageToLoad("30000");
  assertTrue(selenium.isTextPresent("Add New Post"));
}

@Test(description="Writes the new post")
public void writeBlogPost() {
  selenium.type("title", "New Blog Post");
  selenium.click("edButtonHTML");
  selenium.type("content", "This is a new post");
  //TODO:Assert
}

@Test(description="Publishes the post")
public void publishBlogPost() {
  selenium.click("submitdiv");
  selenium.click("publish");
  selenium.waitForPageToLoad("30000");
  assertTrue(selenium.isTextPresent("Post published."));
}

@Test(description="Verifies the post")
public void verifyBlogPost() {
  selenium.click("//a[contains(text(),'Posts') and contains(@class,'wp-first-item')]");
  selenium.waitForPageToLoad("30000");
  assertTrue(selenium.isElementPresent("//a[text()='New Blog Post']"));
}

@Test(description="Logs out")
public void logout() {
  selenium.click("//a[text()='Log Out']");
  //TODO:Assert
}
These are the test methods (or steps) we are going to use.
Configuration methods
If you are familiar with unit testing frameworks, you probably know about the setup and teardown methods. TestNG goes beyond that idea and allows you to define methods that will be run after or before your test suites, test groups or test methods.
This is very useful for our Selenium tests because you can create a Selenium server and browser instance before you start running your test suite.)
To achieve this, we will use two TestNG annotations: @BeforeSuite and @AfterSuite:
@BeforeSuite(alwaysRun = true)
public void setupBeforeSuite(ITestContext context) {
  String seleniumHost = context.getCurrentXmlTest().getParameter("selenium.host");
  String seleniumPort = context.getCurrentXmlTest().getParameter("selenium.port");
  String seleniumBrowser = context.getCurrentXmlTest().getParameter("selenium.browser");
  String seleniumUrl = context.getCurrentXmlTest().getParameter("selenium.url");

  RemoteControlConfiguration rcc = new RemoteControlConfiguration();
  rcc.setSingleWindow(true);
  rcc.setPort(Integer.parseInt(seleniumPort));

  try {
    server = new SeleniumServer(false, rcc);
    server.boot();
  } catch (Exception e) {
    throw new IllegalStateException("Can't start selenium server", e);
  }

  proc = new HttpCommandProcessor(seleniumHost, Integer.parseInt(seleniumPort),
      seleniumBrowser, seleniumUrl);
  selenium = new DefaultSelenium(proc);
  selenium.start();
}

@AfterSuite(alwaysRun = true)
public void setupAfterSuite() {
  selenium.stop();
  server.stop();
}
PS: Did you notice those weird parameters? They are stored in the XML file (we are going to see in the next section) and accessed by a ITestContext object, which was injected.
By adding these annotations, the TestNG engine will invoke the configuration methods automatically before/after your test suite (make sure the test methods are annotated with @Test), launching the Selenium server and instantiating the Selenium client object only once, reusing the same browser session across the tests.
Creating the XML file
To define the order of the tests, we will have to create an XML file listing the test methods we would like to run. Make sure that the test methods are annotated with @Test, or else the TestNG engine will not invoke them.
Before TestNG 5.13.1, you had to use Method Interceptors if you wanted to run the tests in the order defined in the XML file. I have posted my implementation of a Method Interceptor on my Github account. From TestNG 5.13.1+, you can just add the preserve-order parameter to your test tag and include the methods you would like to run, reducing unnecessary code in your test suite.
Here is the XML file:
<suite name="Knorrium.info - Wordpress Demo" verbose="10">
  <parameter name="selenium.host" value="localhost" />
  <parameter name="selenium.port" value="3737" />
  <parameter name="selenium.browser" value="*firefox" />
  <parameter name="selenium.url" value="http://demo.opensourcecms.com/wordpress/" />

  <test name="Write new post" preserve-order="true">
    <classes>
      <class name="test.Wordpress">
        <methods>
          <include name="launchSite" />
          <include name="openAdminPage" />
          <include name="loginAsAdmin" />
          <include name="navigateNewPost" />
          <include name="writeBlogPost" />
          <include name="publishBlogPost" />
          <include name="verifyBlogPost" />
        </methods>
      </class>
    </classes>
  </test>
</suite>
Launching your tests in Eclipse
We finished writing our tests, now how can we run them?
You can launch TestNG from the command line, using a Eclipse plugin or even programatically. We are going to use the Eclipse plugin. Follow the steps described on the official TestNG documentation over here
If you installed TestNG correctly, you will see this menu when you right click on the XML file:

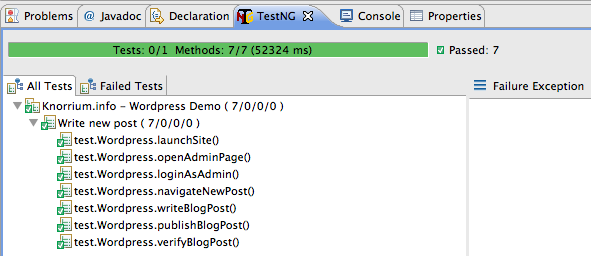
Click on “Run as TestNG Suite” and your test will start running. You will then see this nice results tree:
Thinking about the future
If you really want to think about the future of your test suite, I would recommend you to read Adam Goucher’s article published on PragPub. He talks about Selenium 2 and the Page Objects Model (a very nice way to model your tests, especially if you use Selenium 2).
Since there are lots of people still using Selenium 1, I'll stick to that for a while, but Selenium 2 will eventually be covered here.
As the number of tests in your test suite grows, you will find that grouping them in different test classes is a good idea. If you do that, you can take advantage of object oriented programming and create a new class named BaseTest (for example), and leave your configuration logic there. That way, every test class must extend the BaseTest class and use static attributes.
public class WordPressAdmin extends BaseTest {
@Test
public void test1(){
  selenium.open("");
  //...
}

@Test
public void test2(){
  selenium.open("");
  //...
}
}
This is better than leaving your configuration methods in the test class.